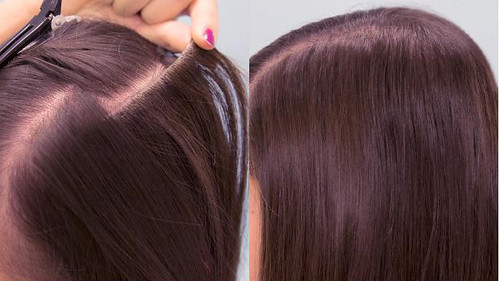
All of our Stock Hair Exension and Lace Wigs are On Sale now, all with discount price.
Qingdao Sailing Hair Products Co., LTD
Qingdao Sailing Hair Products Co.,Ltd is a hair supplier in China. we are specialized in full lace wig, lace front wig, hair weft, keratin hair extension, clip in, tape weft and skin weft. We have more than 10 years rich experience in hair line will offer you the perfect hair products.
2015年2月26日星期四
How to Choose the Best Clip In Hair Extension
The Clip In Hair Extension become the most popular type of hair extensions as they are really easy to apply and remove.
There are the advantages of clip in hair:
1. Easy to install in minutes
2. You can go from short to long hair without ruining your hair
3. Allow you add volume, highlights and length
But when choosing clip in hair extensions, you may meet some problems like the length, weight and so on. Now I will give you some tips on how to choose the best clip-in hair!
1.) You should know how many grams of one set.
Hair is measured in grams, usually if customers have no special request, each clip-in set is about 100 grams. As we all know, each set may have 7 to 10 pieces, so if all length made into 100 grams, each piece may be light-weight and have little hair on them, which would lead to hair slip out very easily.
If you want to add length, 100 grams are not enough. How many grams you need depend on the length you want and how thick and long your own hair is.
Rule of thumb: The longer you want your hair to be…and the shorter and thicker your hair is…the more grams you will need.
2.) How many grams do I need for clip-in hair?
The weight of one set clip in hair depends on the length you want and your own hair. If your hair is only shoulder, then you need a lot more grams for a full hand. Sailing Hair always recommend clients different grams with varying hair lengths. For example, for 20″ length you will only need about 150-180 grams and for 16″ long extensions you may need only 100-130 grams.
3.) What length of clip-in hair extensions should I choose?
The longer and fuller you want the hair to be, the heavier you will wear. If you just start out, you’d better not choose the longer one. Once you get used to them, then graduate to more length slowly.
4.) Which kind of clips are better used?
There are two main kinds of clips: one is u-shaped tines and another is straight tines like a fork. Usually we would recommend customers to choose the u-shaped in with silicone lining one the cross-bar, which is durable and good for our own hair.
How to Apply the Strip Eyelash
Have you ever spent hours in front of the mirror
trying to apply false eyelashes, only to end up with them sticking out at
strange angles, or—worse—fall off completely after a few hours? Because false
eyelashes are tricky to master, we tapped Los Angeles–based makeup artist Gia
Brescia to show us her tried-and-true application (and removal) tips.
1.
Size
the lashes. Before gluing the lashes on, you will need to make sure they are
not too wide for your eye. Hold the lash strips up against your eyelid, and
trim them down on the sides if necessary. If the lashes are too long for your
personal taste, consider trimming the individual lashes down to achieve a more
natural look. Lashes should be longer toward the outer corner of the eye.
2.
Apply
high-quality glue for lasting results (Brescia suggests avoiding the glue that
comes with your lashes). If you have a steady hand, you can squeeze straight
from the tube onto the strip. Tend to get shaky? An easy trick: put glue on the
reverse (handle) end of a tweezers and glide it across the strip, as pictured.
Be generous at both the inner and outer corners so the glue won’t unstick when
you blink.
3.
Place
the strip on your eyelid, positioning it as close as possible to your natural
lashes. Bring the strip down from above, not from the front. This is to ensure
that you get as close as possible to your lashline
4.
Apply
mascara to your lashes. This will help blend your natural lashes with the false
ones, achieving a more natural look. You can use black, brown, or dark gray
mascara.
5.
If you
see a gap showing on the eyelid between your real lashes and false eyelash,
don’t worry! You don’t have to pull it off and start again, says
Brascia. Just fill in the gap, using a matte black eye shadow as a liner
to hide it (we used Inglot Cosmetics Freedom System Eyeshadow in
391). This step will also help the glue dry more quickly.
2014年5月5日星期一
How To Hide Layers Using Layer Blending Weft Hair Extensions
However much we love our hair extensions, there’s just one pesky problem that leaves us in one stressful scenario, our layers.
Layers be gone’ we hear you cry! But fear not, as we have the solution that will put a stop to your tormenting hair nightmare and your layering catastrophe, with the helping hand from layer blending weft hair extensions.
These types of wefts can miraculously disguise layers by blending your natural hair length with your hair extensions, to create sleek, Rapunzel-like hair. Instead of mesh, the layer blending wefts are sealed together with glue for a seamless finish. They also have two clips on either side to attach to your hair.
Take a look at our terrific tricks on to how to hide layers using layer blending weft hair extensions below.
Trick One
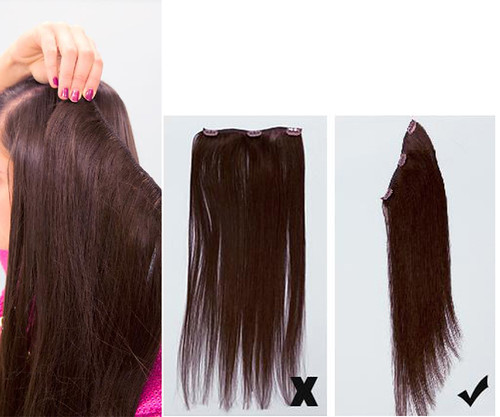
The layer blending wefts are perfect for hiding your layers and for giving the illusion of long locks that are all the same length. To cheat your way to one gorgeous length, start by clipping in your set of full head extensions and leaving your layers out. Then section your layers and clip one layer blending weft hair extension to the hair parting that you have created. This will blend in your layers to your clip in extensions for an immaculate, sleek finish.
Trick Two
Alternatively, for a more natural look, you can clip the layer blending weft hair extensions on an angle to hide your layers.
Trick Three
Another trick for hiding your layers is to straighten your short layers with the longer pieces of your hair extensions. This will help to blend your natural and hair extension hair together.
We love how our layers magically disappear just by using layer blending weft hair extensions! What do you think of these innovative hair pieces?
2014年4月18日星期五
2013年1月9日星期三
Ways to Identify Human and Synthetic Hair
Nowadays, hair
products are becoming more and more popular among ladies, but some suppliers
are using synthetic hair to replace human hair or mixing the two to create a
blend of human and synthetic hair. Of course there is only one reason for this,
in order to reduce the price. This article is designed to enable you the
ability in detecting the differences, “How to identify human hair from
synthetic hair”, here are two ways.
Firstly, using the
microscope. If the hair is synthetic, it is made from a form of plastic that
will appear clear when lit and magnified under a microscope. Natural hair that
has never been dyed will have a solid core and clear outer layer, while dyed
natural hair will have solid color throughout. However, since most of us do not
own a microscope or have one readily available this is probably not a suitable
option, unless of course you’re a wig wearing Forensic Scientist.
A better and
easier way of testing include the use of fire, taking a simple match or lighter
to one strand (using tweezers) of the hair and simply burning this one strand
for less than a second and pulling the flame away will clearly show you the
difference.
Pay attention to
the smell and the way the hair burns. Human hair has a distinctive sulfuric
odor. When it is lit, the flame will flicker out quickly unless you continue
burning it and the ash will be powdery. The tips will also curl and/or look
broken.
Watch how
synthetic hairs burn. Synthetic fibers will continue to burn up quickly after
you've taken the flame away. Polyester hair burns and melts at the same time; it
has a slightly sweet smell and leaves sticky beads on your fingers. Nylon hair
smells like cooked vegetables and will burn up quickly with a sparkling flame,
leaving hard beads behind.
We hope to have
taught you well in order to stop you being over-priced for a lower quality wig
than what your paying for.
订阅:
博文 (Atom)


